How to Compress JPEG Files Without Losing Quality
How to Compress JPEG Files Without Losing Quality
Have you ever tried to email a bunch of vacation photos only to get that dreaded "file too large" message? Or maybe you've uploaded an image to your website only to watch it load at a snail's pace? We've all been there. The good news is that compressing your JPEG files doesn't have to mean sacrificing quality.
Last summer, I was putting together a photography portfolio website and kept running into storage limits and slow page loading. After hours of frustration and research, I discovered some game-changing techniques for compressing JPEGs while maintaining their visual integrity. Today, I'm sharing those insights with you.

Understanding JPEG Compression: The Basics
Before diving into compression techniques, it helps to understand what actually happens when you compress a JPEG image. Unlike some file formats, JPEG uses what's called "lossy compression" — it reduces file size by permanently discarding some information.
But here's the thing — not all information is created equal when it comes to what our eyes can perceive!
JPEG compression works by analyzing the image in 8×8 pixel blocks and simplifying the color and brightness information in ways that are (ideally) less noticeable to human vision. The compression algorithm takes advantage of how our eyes perceive images — we're more sensitive to changes in brightness than changes in color.
When you save a JPEG at different quality levels, you're essentially telling the algorithm how aggressive it should be with this simplification process. Setting a quality of 100% means "simplify as little as possible," while lower settings allow more aggressive compression.
The challenge is finding that sweet spot where the file size decreases significantly without creating visible artifacts like:
- Blocky patterns in gradients
- Blurry text
- Color banding
- Weird halos around sharp edges
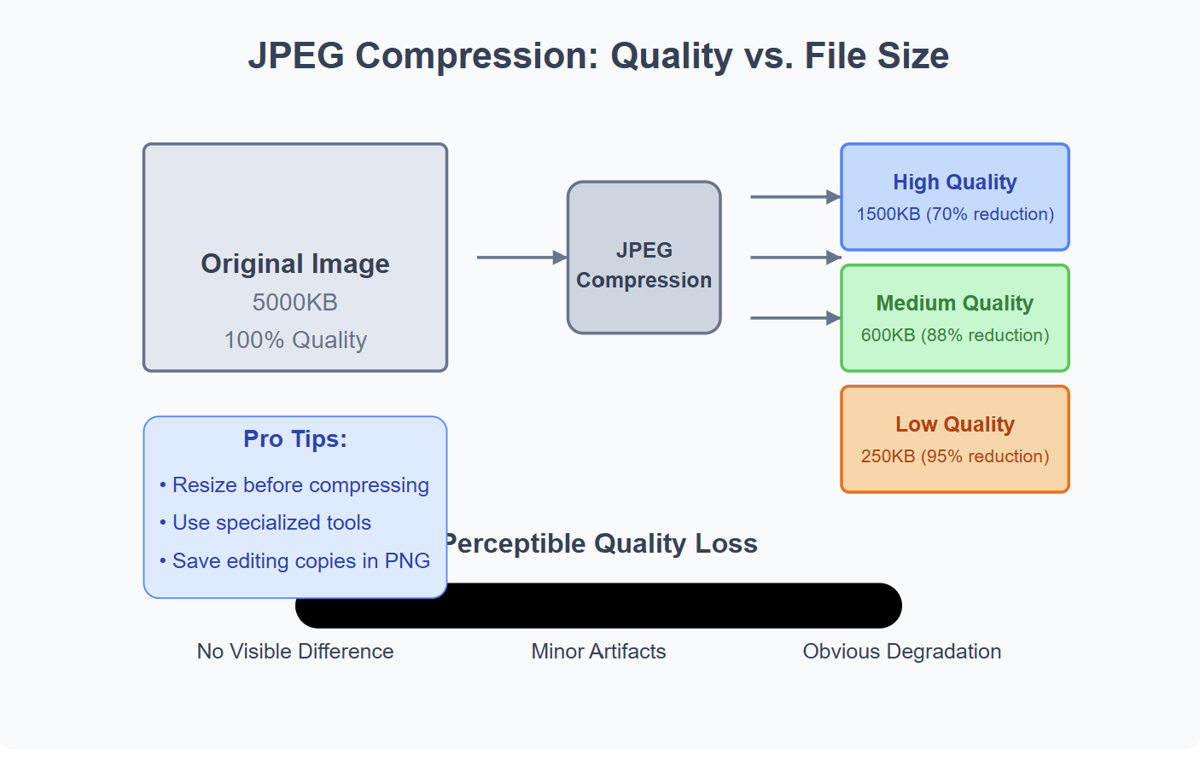
The Quality-Size Balancing Act
When it comes to JPEG compression, there's always a trade-off between file size and visual quality. But that doesn't mean you have to settle for poor-looking images! With the right approach, you can reduce file sizes by 50-80% while maintaining quality that looks virtually identical to the original to the untrained eye.
Think of JPEG compression like packing for a trip — you want to bring everything you need while using the smallest suitcase possible. You might need to leave behind a few items you rarely use, but you shouldn't sacrifice the essentials.
Smart Compression Techniques That Preserve Quality
1. Use the "Save for Web" Option in Editing Software
Most professional image editing software includes a "Save for Web" or similar export option that's specifically designed to optimize images for online use.
In Adobe Photoshop, for example:
- Go to File > Export > Save for Web (Legacy)
- Select JPEG as the format
- Adjust the quality slider while watching the preview
- Look for the sweet spot where file size decreases but visual changes are minimal
I was editing wedding photos last month and found that using quality settings between 70-80% in the Save for Web dialog typically reduced file sizes by about 60-70% with virtually no perceptible quality loss for most photos.
2. Resize Before Compressing
One of the simplest yet most effective tricks is to ensure your image is only as large as it needs to be before compression. If your image will be displayed at 800px wide on your website, there's no need to upload a 3000px version!
By resizing first, you're already reducing the amount of data that needs to be compressed, which means less quality loss during the compression process.
For instance, I recently had to upload 50 product images to an e-commerce site. By first resizing them to the exact dimensions needed for the product pages (1200×800 pixels), I was able to reduce the overall file size by about 75% before even applying compression.

3. Try Modern JPEG Compression Tools
Several newer tools have been developed specifically to optimize JPEG compression beyond what standard software offers:
- JPEGmini: Uses proprietary algorithms to reduce file size while preserving perceptual quality
- ImageOptim (Mac): Strips unnecessary metadata and optimizes compression
- FileOptimizer (Windows): Applies multiple optimization techniques without changing visible quality
- Squoosh: Google's web-based tool that offers impressive compression with real-time previews
These specialized tools often achieve 30-50% better compression than standard software while maintaining the same visual quality.
4. Consider the Content of Your Image
Not all images compress equally! The effectiveness of JPEG compression varies significantly depending on what's in the picture:
- Photographs with smooth color transitions compress very efficiently
- Images with sharp text or fine lines don't compress as well
- Images with large areas of solid color might benefit from PNG format instead
Last week, I was working on my travel blog and noticed that landscape photos with lots of sky and water compressed beautifully, while city scenes with lots of detailed architecture didn't compress nearly as well.
5. Use Batch Processing for Multiple Images
If you need to compress many JPEGs at once — which, let's face it, is usually the case — batch processing is your friend! Tools like Adobe Bridge, XnConvert, or command-line utilities like ImageMagick can apply consistent compression settings to hundreds or thousands of images at once.
How to Compress JPEGs Step-by-Step
Let me walk you through my go-to process for compressing JPEG images without sacrificing quality:
- Start with the highest quality original image possible (ideally the RAW file if available)
- Edit the image first — apply all color corrections, cropping, and adjustments before compression
- Resize to the required dimensions for your specific use case
- Remove unnecessary metadata if privacy or file size is a concern
- Apply compression gradually — start with high quality settings (80-90%) and adjust downward while comparing with the original
- View the compressed image at 100% zoom to check for artifacts or quality issues
- Test the image in its intended environment — a website image looks different on a webpage than in an editing program
- Save a copy and preserve your original for future editing needs
This workflow has consistently produced excellent results for my photography projects over the past year.
Advanced Techniques for the Perfectionists
If you're really serious about optimizing your JPEGs — perhaps you're a professional photographer or web developer — there are some advanced approaches worth considering:
Content-Aware Compression
Some newer compression tools analyze the content of specific image areas and apply different compression levels accordingly. For example, they might preserve more detail in faces or text while applying stronger compression to background areas.
Progressive JPEGs
Consider saving your images as progressive JPEGs, which load in passes of increasing quality. This not only improves perceived loading speed for website visitors but can sometimes result in better overall compression.
Variable Quality Settings
Instead of applying the same compression level to all images, analyze each one individually. Some photos might look great at quality 60%, while others need 85% to maintain acceptable quality.
I tested this approach on my portfolio website and found that I could reduce the average file size by an additional 20% by customizing compression levels for each image rather than using a one-size-fits-all approach.
Common Mistakes to Avoid
In my journey to master JPEG compression, I've made plenty of mistakes. Learn from my experience and avoid these pitfalls:
- Repeatedly saving as JPEG — each save compounds quality loss, so save intermediate edits in a lossless format like PSD or TIFF
- Compressing screenshots or text-heavy images as JPEGs — use PNG for these instead
- Using arbitrary quality settings without visually checking the results
- Over-sharpening before compression — this often amplifies compression artifacts
- Not considering the viewing context — images viewed on mobile devices can often tolerate more compression than those viewed on large monitors
FAQ About JPEG Compression
Is there truly such a thing as "lossless" JPEG compression?
Strictly speaking, no. The JPEG format is inherently lossy. However, some tools advertise "lossless" JPEG compression, which typically means they're optimizing the encoding without changing the actual pixel values from your original JPEG. They might remove unnecessary metadata or optimize the Huffman tables used in JPEG encoding. These techniques can reduce file size by 10-20% without any additional quality loss.
How can I tell if a JPEG has been over-compressed?
Look for these telltale signs:
- Blocky patterns, especially in areas with gradual color transitions
- Unnatural edges around contrasting objects
- Color banding in previously smooth areas
- An overall "crunchy" appearance
What's the ideal quality setting for JPEGs?
There's no universal answer, but:
- 80-90% quality: Use for professional photography, printing, or archiving
- 60-80% quality: Usually perfect for websites and social media
- 40-60% quality: Acceptable for thumbnails or preview images
- Below 40%: Generally shows visible quality degradation
Should I use JPEG or PNG for my images?
Use JPEG for:
- Photographs and realistic images with many colors
- Images where small file size is critical
- Images without transparency needs
Use PNG for:
- Graphics with text, sharp lines, or few colors
- Images requiring transparency
- Screenshots
- Images that need repeat editing without quality loss
What about WebP and newer formats?
WebP offers both lossy and lossless compression and can create smaller files than JPEG while maintaining similar quality. As of early 2024, browser support for WebP is excellent (over 95% of users), making it a viable alternative to consider. AVIF is another promising format gaining support, offering even better compression.
The Future of Image Compression
Image compression technology continues to evolve rapidly. Machine learning-based approaches are showing promising results in creating smaller files while preserving perceptual quality. Companies like Google and Netflix are investing heavily in developing next-generation image formats that might eventually replace JPEG for many uses.
For now, though, JPEG remains the universal standard for compressed images online. Mastering JPEG compression techniques gives you skills that will remain valuable regardless of how formats evolve.
Conclusion: Finding Your Compression Sweet Spot
Compressing JPEGs without losing quality isn't really about finding one magic setting — it's about understanding the trade-offs and making informed decisions based on each image's content and intended use.
Start with the techniques I've outlined above, but don't be afraid to experiment and develop your own workflow. What works perfectly for one image might not be ideal for another.
Remember: the goal isn't always the smallest possible file size, but rather the optimal balance between size and quality for your specific needs.
Ready to start optimizing your images? Try comparing different compression methods on a test image and see the results for yourself! Your website visitors (and email recipients) will thank you for those faster-loading, space-efficient images that still look fantastic.
If you've found this guide helpful, I'd love to hear about your experiences with JPEG compression. Drop a comment below or share your own tips for maintaining quality while reducing file sizes!
Recommended For You
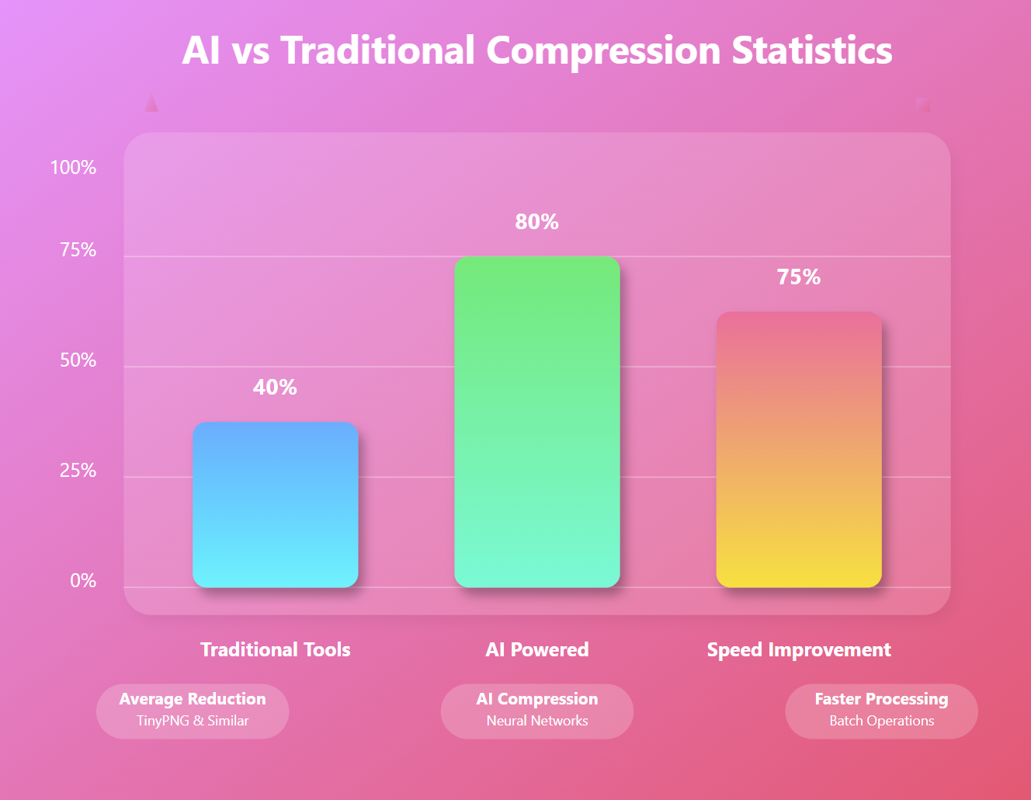
AI Image Compression: How It Works & Best Tools in 2025
AI Image Compression: How It Works & Best Tools in 2025 &n…
Read Now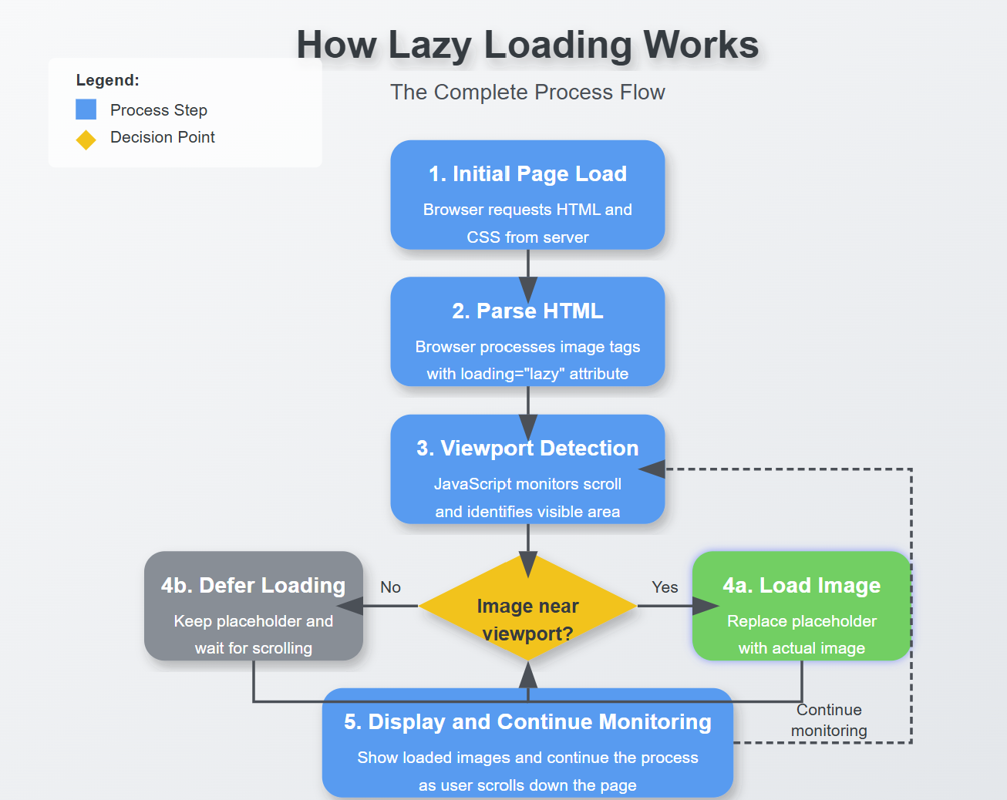
Lazy Loading Images: Does It Really Boost Performance?
Lazy Loading Images: Does It Really Boost Performance? Have you ev…
Read Now
How to Optimize Images for Faster Website Loading
How to Optimize Images for Faster Website Loading Have you ever ab…
Read Now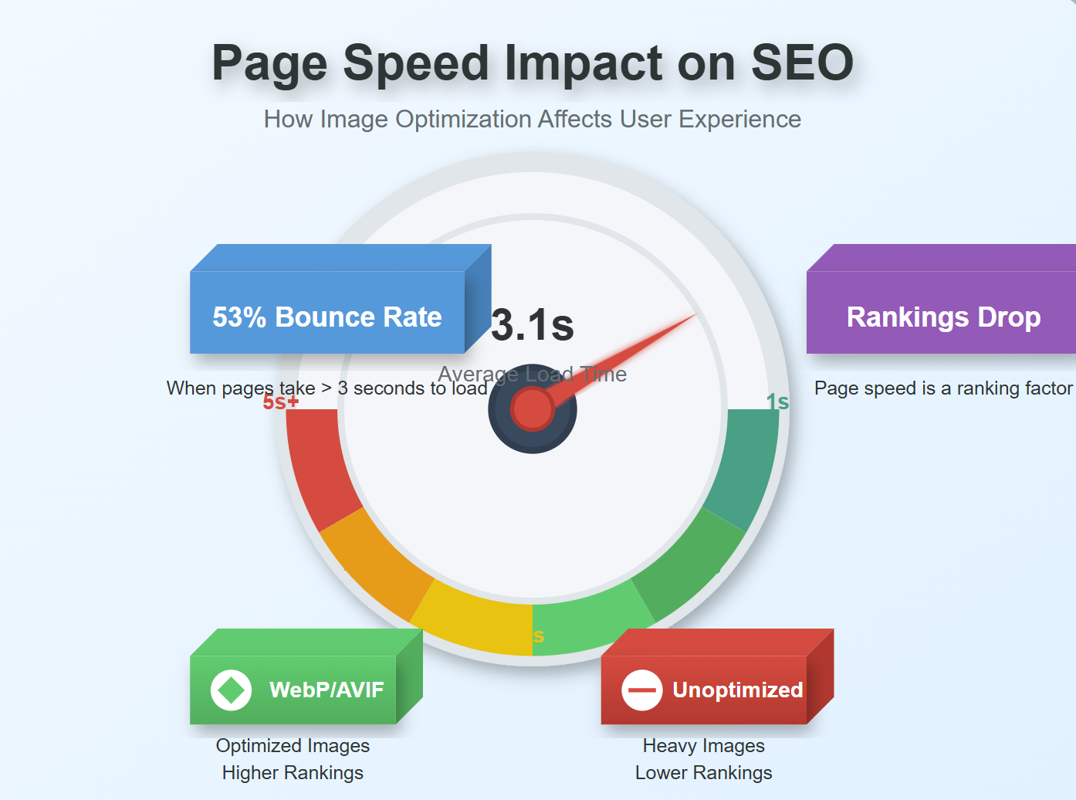
JPEG, PNG, or WebP? Best Image Format for SEO
JPEG, PNG, or WebP? Best Image Format for SEO Introduction: …
Read NowLatest Articles
AI Image Compression: How It Works & Best Tools in 2025
AI Image Compression: How It Works & Best Tools in 2025 Picture this: you've just fi…
Lazy Loading Images: Does It Really Boost Performance?
Lazy Loading Images: Does It Really Boost Performance? Have you ever found yourself impatiently staring at…
How to Optimize Images for Faster Website Loading
How to Optimize Images for Faster Website Loading Have you ever abandoned a website because it was taking …
JPEG, PNG, or WebP? Best Image Format for SEO
JPEG, PNG, or WebP? Best Image Format for SEO Introduction: Why Image Formats Matter for Your SEO St…
7 Ways to Protect Your Images from Copyright Theft
7 Ways to Protect Your Images from Copyright Theft In today's digital landscape, images have become the currency…
How to Add a Transparent Watermark (Without Ruining Quality)
How to Add a Transparent Watermark (Without Ruining Quality) Introduction: Protecting Your Visual Content Have yo…
Never Miss an Update
Subscribe to our newsletter and stay updated with the latest blog posts and tech trends.