How to Resize Images Without Distortion or Quality Loss
How to Resize Images Without Distortion or Quality Loss
Whether you're preparing images for your website, social media, or printing, resizing is often necessary. But nothing ruins a great photo faster than stretching, pixelation, or distortion. The good news? With the right approach, you can resize images without compromising their quality or proportions.
This guide covers everything you need to know about resizing images properly, from understanding aspect ratios to choosing the right tools and techniques.

Why Images Get Distorted When Resizing
Before diving into solutions, it's important to understand why images become distorted in the first place:
Aspect Ratio Problems
The most common cause of distortion is changing an image's width and height disproportionately. Every image has an aspect ratio—the proportional relationship between its width and height (expressed as W
). When you change only one dimension without maintaining this ratio, the image stretches or squishes.
Resolution Issues
Enlarging images beyond their original resolution leads to pixelation—those blocky, blurry artifacts that make photos look unprofessional. This happens because the software must create new pixels that didn't exist before, guessing what should fill those spaces.
Improper Scaling Methods
Not all scaling algorithms are created equal. Basic scaling methods (like nearest neighbor) work quickly but produce lower quality results compared to advanced methods like bicubic or Lanczos resampling.

Essential Principles for Distortion-Free Resizing
Follow these key principles to maintain image quality when resizing:
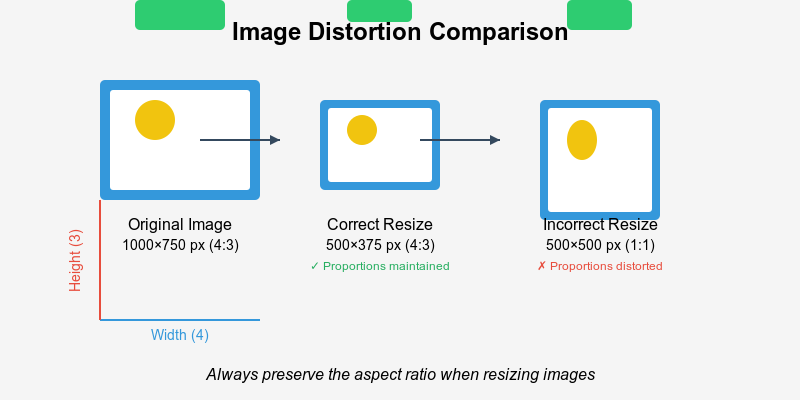
1. Always Preserve Aspect Ratio
The golden rule of resizing is to maintain the original aspect ratio. This means if you change the width, the height should change proportionally (and vice versa).
For example, if your original image is 1000×750 pixels (4:3 ratio):
- Correct resize: 500×375 pixels (still 4:3)
- Incorrect resize: 500×500 pixels (now 1:1, causing distortion)
2. Avoid Enlarging Beyond Original Size
As a general rule, you can safely downsize images but should avoid enlarging them beyond their original dimensions. When you enlarge an image, you're asking your software to create information that doesn't exist, resulting in quality loss.
3. Use the Right Resampling Method
Different situations call for different resampling methods:
- Bicubic: Best overall option for most photos
- Lanczos: Excellent for detailed images when quality is crucial
- Bilinear: Good middle ground between speed and quality
- Nearest Neighbor: Best for pixel art or graphics with sharp edges
Step-by-Step Guide to Resize Without Distortion

Here's how to resize images perfectly, regardless of which tool you're using:
Method 1: Constrained Proportions (Best for Most Cases)
- Open your image in your preferred editing software
- Find the resize or image size option
- Enter your desired width OR height (not both)
- Ensure "Maintain aspect ratio" or "Constrain proportions" is checked
- Apply the change
This method automatically calculates the other dimension to preserve proportions.
For a faster approach, try our Pro image compressor which automatically maintains aspect ratio while giving you full control.
Method 2: Cropping (When Specific Dimensions Are Required)
Sometimes you need an image to fit exact dimensions (like social media profiles or headers):
- Resize your image to match the larger of the two required dimensions
- Use the crop tool to trim excess parts of the image
- Position the crop area to keep the most important part of the image
- Apply the crop
This approach ensures no distortion while meeting specific size requirements.
Method 3: Canvas Size Adjustment (For Adding Space)
If you need specific dimensions without cropping important content:
- Resize the image proportionally to fit within your target dimensions
- Increase the canvas size to your required dimensions
- Position your image within the new canvas
- Fill the extra space with a complementary color or make it transparent
Best Tools for Distortion-Free Resizing
Online Tools
- Pro image compressor: Automatically maintains aspect ratio while giving you precise control over dimensions
- Adobe Express: Offers simple resizing with presets for common uses
- Canva: Great for creating images with specific dimensions
Desktop Software
- Adobe Photoshop: Professional-grade control over every aspect of resizing
- GIMP: Free alternative with professional features
- Paint.NET: User-friendly option for Windows users
Mobile Apps
- Snapseed: Powerful mobile editor with precise resizing options
- Adobe Lightroom Mobile: Professional-grade editing and resizing
- Pixlr: Easy to use with automatic aspect ratio maintenance
Special Resizing Scenarios

Resizing for Social Media
Each platform has specific dimensions and aspect ratios:
- Instagram Posts: 1:1 (square), 4:5 (portrait), or 1.91:1 (landscape)
- Facebook Cover Photos: 851×315 pixels
- Twitter Header: 1500×500 pixels
For platform-perfect images, use our Pro image compressor to quickly adapt your photos for any platform.
Resizing for Print
When preparing images for print:
- Maintain at least 300 DPI (dots per inch)
- Convert to CMYK color mode for best results
- Resize using the dimensions in inches/cm multiplied by the DPI
For example, for a 4×6 inch print at 300 DPI, your image should be 1200×1800 pixels.
Resizing for Email and Messaging
For sharing via email or messaging apps:
- Reduce dimensions to what's reasonably viewable (typically 1000-1500 pixels on the long edge)
- Use JPG format with moderate compression
- Aim for file sizes under 1MB for easy sharing
Need to resize images specifically for WhatsApp? Try our Pro image compressor that optimizes both dimensions and file size for messaging.
Advanced Tips for Perfect Resizing
Sharpen After Resizing
Resizing, especially downsizing, can slightly blur images. Apply a light sharpening filter after resizing to restore crispness:
- Resize your image first
- Apply Unsharp Mask or Smart Sharpen with subtle settings
- Zoom in to 100% to check that the sharpening looks natural
Use Smart Objects in Photoshop
For maximum flexibility in Photoshop:
- Convert your layer to a Smart Object before resizing
- Make your size adjustments
- This allows non-destructive editing and prevents quality loss from multiple resizes
Two-Step Downsizing for Maximum Quality
When significantly reducing image size:
- Resize to 50% of the original size
- Apply a light sharpen filter
- Resize again to reach your target size
- Apply final sharpening if needed
This gradual approach produces better results than resizing in one step.
Common Resizing Mistakes to Avoid
- Ignoring aspect ratio: Always maintain proportions unless distortion is intentional
- Repeatedly resizing the same file: Each resize degrades quality; start fresh from the original
- Using "Fit to Page" for printing: This can distort images if the page aspect ratio differs
- Forgetting to check at 100% zoom: Always examine resized images at actual size
After resizing, you may need to compress your images for web use. Our Pro image compressor can help optimize file size while maintaining quality.
FAQ
Q: Can I resize an image larger without losing quality? A: There are limitations to enlarging images. AI-powered upscaling tools can help, but they work best when increasing size by no more than 200%. Beyond that, quality degradation becomes noticeable.
Q: Why do my resized images look blurry? A: Downsizing can reduce sharpness. Apply a subtle sharpening filter after resizing to restore crispness.
Q: What's the best file format for resized images? A: For photographs, use JPG with high quality settings or WebP. For graphics with text or transparency, use PNG.
Q: Should I resize images before or after editing them? A: Always perform edits (color correction, retouching) on the original-sized image, then resize as the final step.
Q: How do I resize an image to exactly 50KB for messaging apps? A: Use our Pro image compressor which combines resizing and compression to achieve very specific file sizes.
Conclusion
Resizing images without distortion comes down to understanding and respecting aspect ratios, using appropriate tools, and following best practices. By maintaining proportions and using the right techniques, you can ensure your images always look their best at any size.
Whether you're preparing content for your website, social media, or print materials, proper resizing preserves the impact and quality of your visual content.
Need to resize multiple images quickly while maintaining perfect proportions? Our Pro image compressor makes the process simple and guarantees distortion-free results every time.
Recommended For You
AI Image Compression: How It Works & Best Tools in 2025
AI Image Compression: How It Works & Best Tools in 2025 &n…
Read Now
Lazy Loading Images: Does It Really Boost Performance?
Lazy Loading Images: Does It Really Boost Performance? Have you ev…
Read Now
How to Optimize Images for Faster Website Loading
How to Optimize Images for Faster Website Loading Have you ever ab…
Read Now
JPEG, PNG, or WebP? Best Image Format for SEO
JPEG, PNG, or WebP? Best Image Format for SEO Introduction: …
Read NowLatest Articles
AI Image Compression: How It Works & Best Tools in 2025
AI Image Compression: How It Works & Best Tools in 2025 Picture this: you've just fi…
Lazy Loading Images: Does It Really Boost Performance?
Lazy Loading Images: Does It Really Boost Performance? Have you ever found yourself impatiently staring at…
How to Optimize Images for Faster Website Loading
How to Optimize Images for Faster Website Loading Have you ever abandoned a website because it was taking …
JPEG, PNG, or WebP? Best Image Format for SEO
JPEG, PNG, or WebP? Best Image Format for SEO Introduction: Why Image Formats Matter for Your SEO St…
7 Ways to Protect Your Images from Copyright Theft
7 Ways to Protect Your Images from Copyright Theft In today's digital landscape, images have become the currency…
How to Add a Transparent Watermark (Without Ruining Quality)
How to Add a Transparent Watermark (Without Ruining Quality) Introduction: Protecting Your Visual Content Have yo…
Never Miss an Update
Subscribe to our newsletter and stay updated with the latest blog posts and tech trends.