What's the Best Resolution for Printing Photos? (DPI Guide)

What's the Best Resolution for Printing Photos? (DPI Guide)
Have you ever printed a photo only to find it looks pixelated, blurry, or just... off? I've been there too. Last summer, I spent hours capturing perfect vacation moments in Yosemite, only to end up with disappointing prints that looked nothing like what I saw on my screen. That frustrating experience sent me down a rabbit hole of understanding photo resolution, and specifically, the mysterious world of DPI.
Whether you're printing family portraits, landscape photography, or images for your small business, understanding the best DPI for printing photos is essential to achieving professional-quality results. In this comprehensive guide, I'll walk you through everything you need to know about resolution, DPI, and how to prepare your digital images for stunning prints.

What Is DPI and Why Does It Matter?
DPI stands for "dots per inch" and refers to the number of ink dots a printer places within one inch of your printed image. The higher the DPI, the more detail your printer can reproduce, resulting in a sharper, more detailed print.
Think of it this way: imagine trying to draw a perfect circle using only 10 dots versus 300 dots. The circle made with 300 dots will appear much smoother and more defined. The same principle applies to printing photos—more dots (higher DPI) equals better detail reproduction.
While we commonly use DPI when discussing print resolution, it's worth noting that technically, PPI (pixels per inch) refers to digital image resolution, while DPI specifically relates to printer output. However, these terms are often used interchangeably in everyday conversation about photo printing.
The Standard: 300 DPI vs. 72 DPI
When it comes to print-quality images, industry standards typically recommend 300 DPI as the sweet spot for most photo printing needs. But why 300? And what's the deal with 72 DPI?
300 DPI: The Print Standard
300 DPI has become the universally accepted standard for printed photographs because it strikes an optimal balance between file size and visual quality. At this resolution, the human eye typically can't distinguish individual dots at normal viewing distances, creating the illusion of continuous tone.
Most photo lab requirements specifically ask for 300 DPI images because:
- It provides sufficient detail for sharp, clear prints
- It works well with standard photo paper and ink technology
- It creates files that aren't unnecessarily large or unwieldy

72 DPI: The Digital Standard
On the other hand, 72 DPI has long been the standard for digital displays. This lower resolution works perfectly fine on screens because monitors don't need as much information to display images clearly. That's why web graphics and images intended only for screen viewing are typically saved at 72 DPI—the files are much smaller and load faster online.
This difference between print and digital standards explains why an image that looks perfect on your computer screen might print poorly. Your beautiful vacation photo might be 72 DPI—perfect for Facebook sharing but inadequate for that 8×10 print you wanted for your wall.
How to Determine the Right DPI for Different Print Sizes
Not all print jobs require the same resolution. The appropriate DPI can vary depending on the print size and viewing distance. Here's a practical breakdown:
Standard Photo Prints (4×6, 5×7, 8×10)
- Recommended DPI: 300 DPI
- Why: These prints are typically viewed up close, requiring maximum detail
Large Format Prints (11×14, 16×20, 24×36)
- Recommended DPI: 240-300 DPI
- Why: Slightly lower resolution can work because these prints are generally viewed from a greater distance
Posters and Billboards
- Recommended DPI: 150-200 DPI
- Why: Very large prints viewed from significant distances don't require maximum resolution
I learned this lesson the hard way when I tried printing a smartphone photo at 16×20 inches. Despite being taken on a decent camera, the effective resolution wasn't sufficient for that size, resulting in a disappointingly fuzzy print. Now I always calculate the maximum print size my camera can support at 300 DPI before shooting important photos.
How to Check and Change Your Photo's DPI
Now that you understand the importance of proper resolution, how do you check what you're working with? Here's a simple guide:
Checking DPI in Common Software:
On Windows:
- Right-click on the image file
- Select "Properties"
- Click on the "Details" tab
- Look for "Horizontal Resolution" and "Vertical Resolution"
On Mac:
- Open the image in Preview
- Press Cmd+I to open the Info panel
- Click on the "More Info" tab
- Look for "DPI" or "Resolution"
In Adobe Photoshop:
- Open your image
- Go to Image > Image Size
- Look at the "Resolution" field
How to Change DPI Without Losing Quality
If your image isn't at the optimal resolution for printing, you have options:
- Resample with caution: Programs like Photoshop allow you to increase resolution, but this doesn't add actual detail—it just spreads existing pixels across more dots
- Reduce physical dimensions: If your image is 72 DPI but very large in pixel dimensions, you can maintain quality by increasing DPI while reducing the physical print size
- Use specialized software: Tools like Topaz Gigapixel AI or ON1 Resize AI use artificial intelligence to intelligently upscale images with better results than traditional methods
I've had surprising success using AI upscaling on some old family photos I wanted to print larger. While the results weren't quite as good as having proper resolution from the start, they were significantly better than standard resampling.

Common DPI Myths and Misconceptions
Let's clear up some confusion about DPI:
Myth #1: "Higher DPI is always better" Reality: While higher DPI generally produces better prints, there's a point of diminishing returns. Most people can't detect improvements beyond 300-360 DPI, and ultra-high DPI settings just create larger files without visible benefits.
Myth #2: "I can convert a low-res image to high-res by changing the DPI setting" Reality: Simply changing the DPI setting doesn't add new information to your image. A 72 DPI image converted to 300 DPI without resampling will retain exactly the same pixel information—it will just print smaller.
Myth #3: "My printer's DPI setting is the same as my image's DPI" Reality: Modern printers might advertise 4800 DPI or higher, but this refers to the printer's mechanical ability to place ink dots—not the resolution your image needs to be. Your image still only needs 300 DPI for optimal results.
File Types and Their Impact on Print Quality
Resolution isn't the only factor affecting print quality. File format plays an important role too:
JPEG
- Pros: Smaller file sizes, widely compatible
- Cons: Lossy compression can affect quality, especially with multiple edits
- Best for: Casual prints where convenience matters more than maximum quality
TIFF
- Pros: Lossless quality, preserves all image data
- Cons: Very large file sizes
- Best for: Professional printing, archival purposes
PNG
- Pros: Lossless compression, supports transparency
- Cons: Larger than JPEGs, not always supported by print services
- Best for: Graphics with text or transparent elements
RAW
- Pros: Contains all original camera data, maximum editing flexibility
- Cons: Requires processing before printing, very large files
- Best for: Professional photography where careful editing is planned
For my most important prints, I always work from RAW files and export as TIFF for printing. Yes, the files are enormous, but the quality difference is noticeable in fine details and color transitions.
Special Considerations for Different Print Methods
Different printing technologies have different optimal resolution requirements:
Inkjet Printing
- Best results at: 300-360 DPI
- Notes: Higher-end photo inkjets may benefit from slightly higher resolution
Laser Printing
- Best results at: 300 DPI
- Notes: Very consistent quality at standard resolution
Commercial Offset Printing
- Best results at: 300-350 DPI
- Notes: Often used for books, magazines, and professional publications
Dye-Sublimation Printing
- Best results at: 300 DPI
- Notes: Excellent for continuous-tone photographs
I recently had photos printed both on my home inkjet and through a professional lab using dye-sublimation. Despite using identical files, the dye-sub prints had noticeably better color transitions in sky gradients—a reminder that the printing method matters alongside resolution.
How to Prepare Images for Professional Printing Services
Photo lab requirements can vary, but most professional printing services have similar expectations:
- Resolution: 300 DPI at the final print size
- Color space: sRGB for consumer labs, Adobe RGB for high-end professional printing
- File format: JPEG (high quality) or TIFF
- Bit depth: 8-bit is standard, 16-bit for maximum quality with some premium services
When I'm sending images to my local photo lab, I always:
- Double-check the resolution using the Image Size dialog in Photoshop
- Convert to the lab's preferred color space (usually sRGB)
- Export as highest-quality JPEGs unless they specifically request TIFF
- Include any special instructions about paper type or finish
Practical Step-by-Step Guide: Preparing Your Photos for Print
Let's walk through the complete process of preparing an image for optimal printing:
Step 1: Assess Your Original Image
Check the current resolution and dimensions to determine if your image has sufficient resolution for your desired print size.
Step 2: Calculate Required Pixels
For a specific print size at 300 DPI:
- Width in pixels = Width in inches × 300
- Height in pixels = Height in inches × 300
For example, an 8×10 inch print at 300 DPI requires:
- 8 inches × 300 = 2,400 pixels wide
- 10 inches × 300 = 3,000 pixels tall
Step 3: Adjust Image Size if Needed
If your image has enough pixels, you can simply set the correct resolution. If not, you may need to:
- Print at a smaller size
- Accept slightly lower resolution
- Use specialized software to upscale
Step 4: Optimize for Print
- Apply appropriate sharpening (prints typically need more sharpening than digital display)
- Adjust brightness (prints usually appear darker than screen images)
- Convert to the proper color profile
Step 5: Save in the Appropriate Format
- Use TIFF for maximum quality
- Use high-quality JPEG (level 10-12) for standard printing
Step 6: Test Print
If possible, make a small test print before committing to large or multiple prints to verify everything looks as expected.
FAQ: Common Questions About Photo Resolution and Printing
Q: Can I print a Facebook or Instagram photo?
A: Social media platforms compress images significantly. While you might get acceptable 4×6 prints, anything larger will likely look poor. Try to always print from original, uncompressed images.
Q: How can I tell if my image has enough resolution for printing?
A: Multiply your desired print dimensions (in inches) by 300 to find the pixel dimensions you need. If your image has at least that many pixels, you're good to go.
Q: Does my smartphone take high enough resolution photos for printing?
A: Most modern smartphones capture 12MP+ images, which is sufficient for standard prints up to 8×10 or even 11×14. However, factors like lens quality and lighting still affect overall print quality.
Q: What's the difference between 300 DPI vs 72 DPI in terms of file size?
A: A 300 DPI image contains approximately 17 times more pixels than the same physical size at 72 DPI, resulting in a file roughly 17 times larger.
Q: Why do my prints look darker than on my screen?
A: Screens emit light while prints reflect it. To compensate, try brightening images 10-15% before printing or calibrate your monitor for print work.
Q: Can I improve a low-resolution image for printing?
A: While traditional resizing can't add detail, AI-powered tools like Topaz Gigapixel AI, Adobe's Super Resolution, or ON1 Resize AI can intelligently upscale images with better results than conventional methods.
Conclusion: Finding Your Photo's Perfect Resolution
Understanding the best DPI for printing photos doesn't have to be complicated. For most purposes, aiming for 300 DPI at your desired print size will ensure excellent results. Remember these key takeaways:
- 300 DPI is the standard for high-quality photo prints
- Digital images (72 DPI) need adjustment before printing
- Calculate required pixel dimensions before shooting important photos
- Consider viewing distance when determining necessary resolution
- File format matters alongside DPI for optimal quality
By mastering these principles, you'll avoid the disappointment of pixelated or blurry prints and create physical photos that truly capture the moments that matter most.
Ready to put this knowledge into practice? Take your favorite digital photo, check its resolution, and see what size you can print it at 300 DPI. You might be surprised by what your existing image library can produce when properly prepared!
Have you had experiences with print resolution issues, or do you have additional questions about preparing photos for printing? Share your thoughts in the comments below—I'd love to hear about your photo printing journey!
Recommended For You
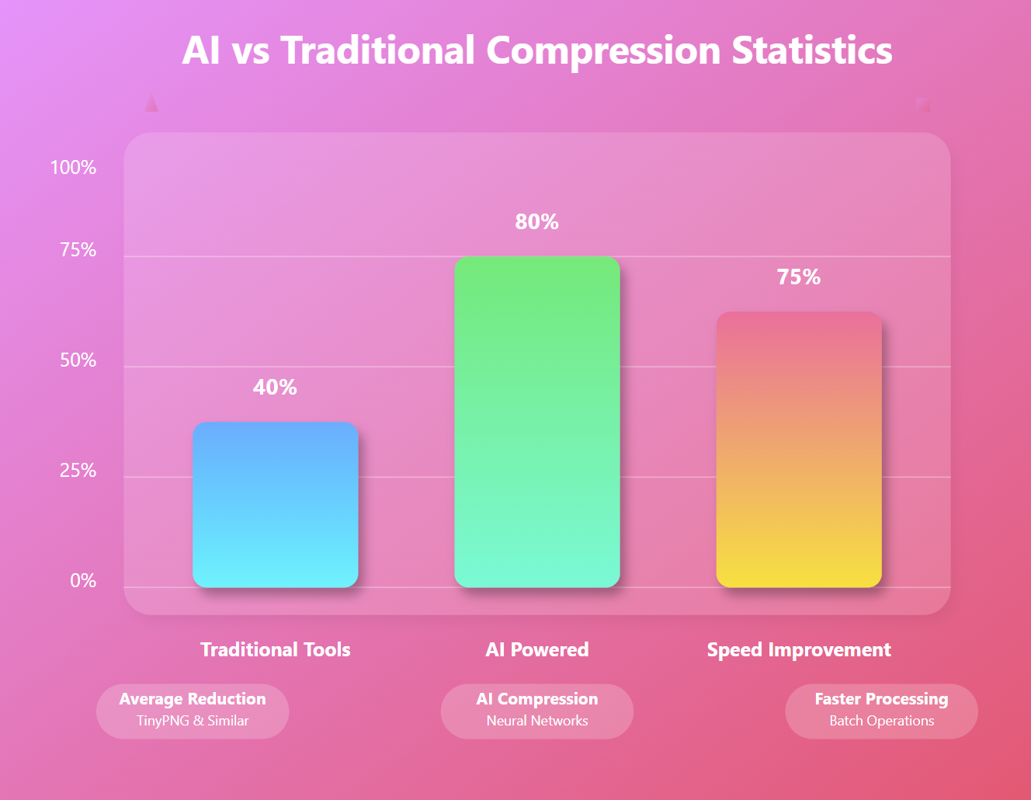
AI Image Compression: How It Works & Best Tools in 2025
AI Image Compression: How It Works & Best Tools in 2025 &n…
Read Now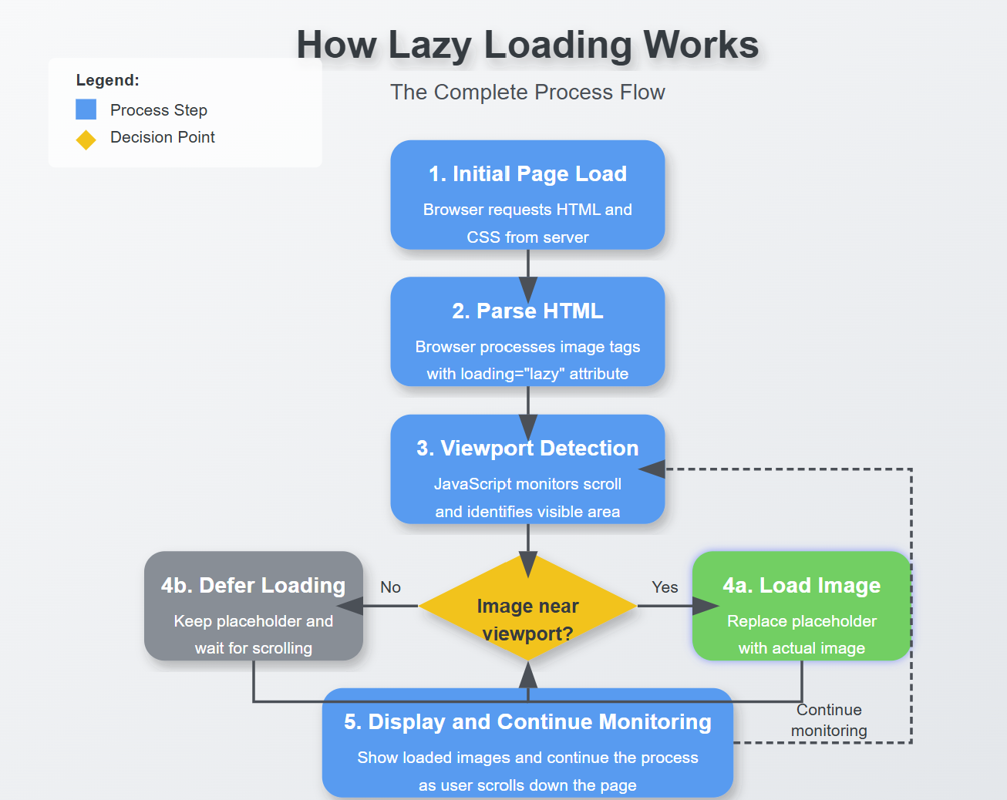
Lazy Loading Images: Does It Really Boost Performance?
Lazy Loading Images: Does It Really Boost Performance? Have you ev…
Read Now
How to Optimize Images for Faster Website Loading
How to Optimize Images for Faster Website Loading Have you ever ab…
Read Now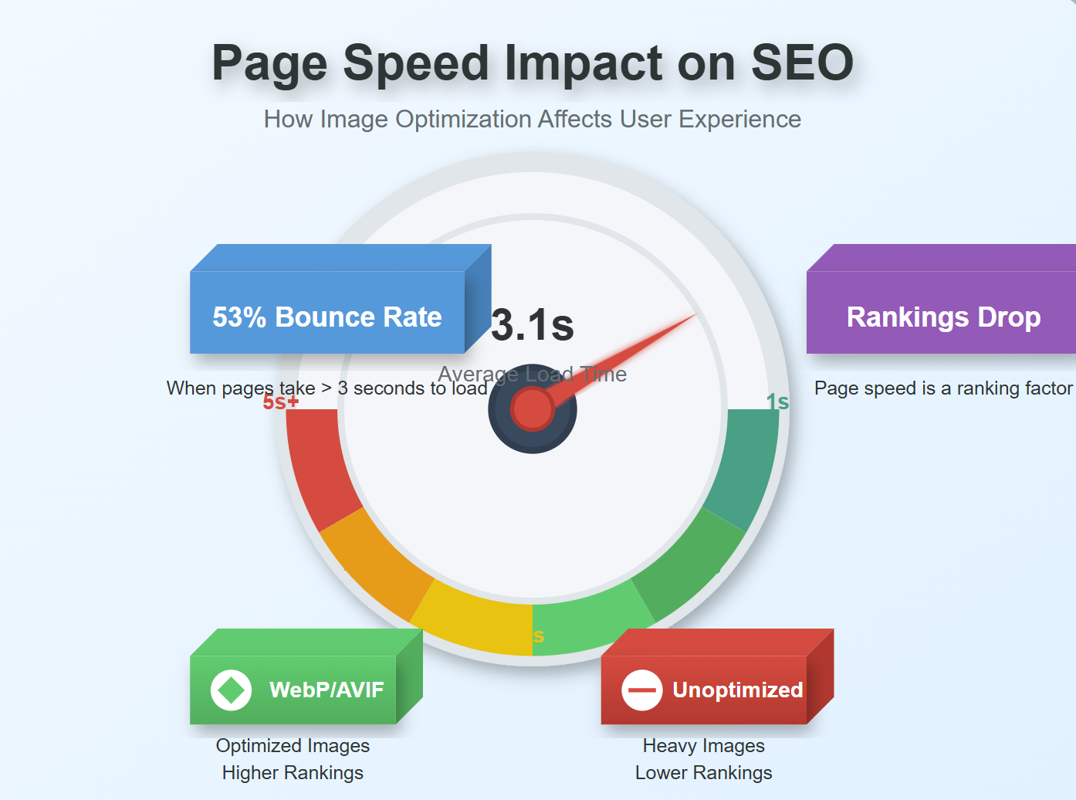
JPEG, PNG, or WebP? Best Image Format for SEO
JPEG, PNG, or WebP? Best Image Format for SEO Introduction: …
Read NowLatest Articles
AI Image Compression: How It Works & Best Tools in 2025
AI Image Compression: How It Works & Best Tools in 2025 Picture this: you've just fi…
Lazy Loading Images: Does It Really Boost Performance?
Lazy Loading Images: Does It Really Boost Performance? Have you ever found yourself impatiently staring at…
How to Optimize Images for Faster Website Loading
How to Optimize Images for Faster Website Loading Have you ever abandoned a website because it was taking …
JPEG, PNG, or WebP? Best Image Format for SEO
JPEG, PNG, or WebP? Best Image Format for SEO Introduction: Why Image Formats Matter for Your SEO St…
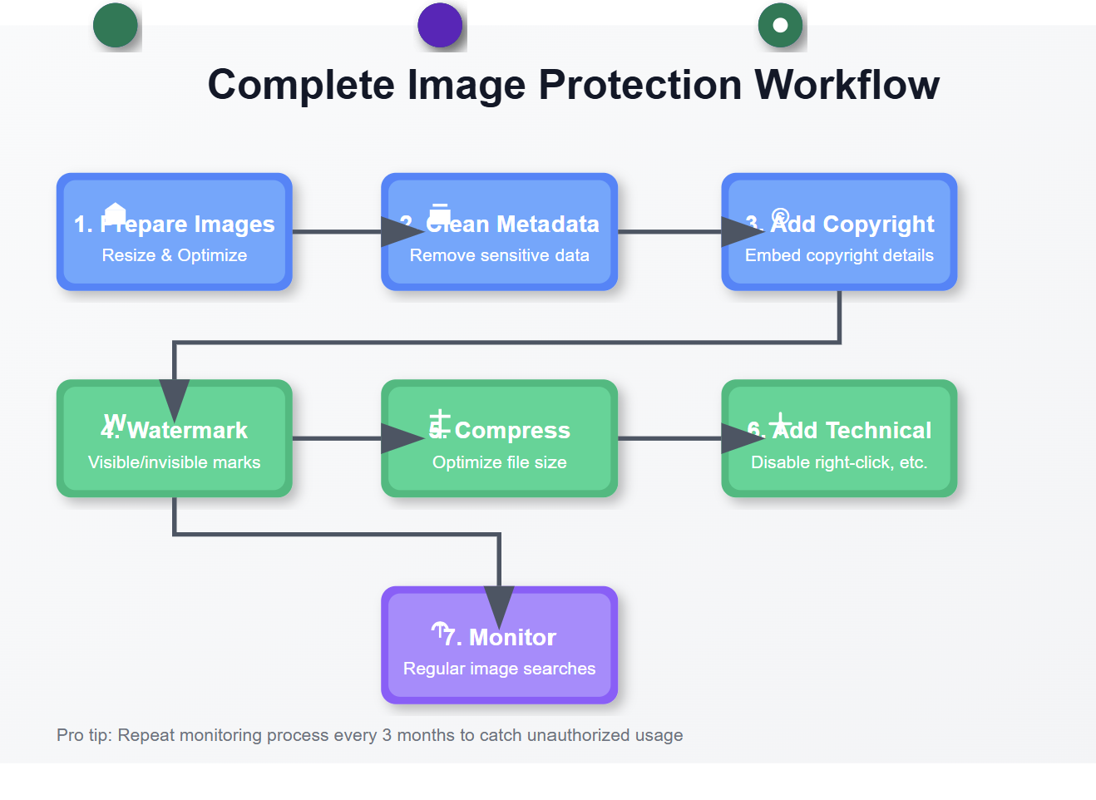
7 Ways to Protect Your Images from Copyright Theft
7 Ways to Protect Your Images from Copyright Theft In today's digital landscape, images have become the currency…
How to Add a Transparent Watermark (Without Ruining Quality)
How to Add a Transparent Watermark (Without Ruining Quality) Introduction: Protecting Your Visual Content Have yo…
Never Miss an Update
Subscribe to our newsletter and stay updated with the latest blog posts and tech trends.